Windows
Introduction
This guide shows the steps for building the RobWork packages on a Windows platform. The guide is written based on a setup with Windows 10 and Visual Studio 2017 and the guide is last revised in March 2022. If you have any suggestions or additions to the guide, please post them on the issue tracker at https://gitlab.com/sdurobotics/RobWork/issues .
RobWork is basically multiple projects:
RobWork : is the core part including math, kinematics, planning and so on.
RobWorkStudio : is the GUI which enable visualization and more user friendly interfaces through gui plugins
RobWorkSim : is an extension to the RobWork core functionality which adds dynamic simulation of bodies, devices and several tactile sensors.
Note that RobWork is needed to run RobWorkStudio and RobWorkSim. Therefore it is not possible to use these, without having RobWork installed on the machine.
Requirements
It is expected that you have a system with:
Windows 10 or 11
64 bits
20GB available disk space (should be enough for build tools, dependencies and all the RobWork packages).
Installing dependencies
RobWork depends on third-party software that must be installed prior to compilation. This includes both build tools and third-party libraries. In Windows it can be a bit tedious to set up all the dependencies, but most packages are easily installed using standard installers. Unfortunately, it is also necessary to compile some dependencies from scratch.
The following dependencies will be described bellow. Please read the important documentation and installation notes under each dependency before installing, as some of the installations might be a little tricky.
RobWork Required Dependencies
When installing these dependencies, it is recommended to not install them in a “Program Files” as these folders are typically locked behind admin privileges. In the following guides the install location will be refereed to as %Install_DIR%. as RobWork useses a cmake package manager eigen3 and qhull will be download and install the first time you run cmake, so unless you need a specific version and know your way around cmake, leave them as is.
RobWorkSim Dependencies
RobWork Physics Engine
A third engine exists, but requires access to code that has not yet been released to the public. Request more information about this if you need it.
Building RobWork
When the dependencies have been installed, RobWork is ready to be built. First, the source must be downloaded, followed by the build procedure.
Expect to use a total of 3 GB for the RobWork projects.
Getting RobWork source files from Git
When all the dependencies have been installed, go ahead and download the newest version of RobWork from the Git repository at:
https://gitlab.com/sdurobotics/RobWork
Note
In order to access the repository, you will need to have an account at GitLab.com and follow the procedure here to gain access: http://robwork.dk/getaccess
Right-click on your desktop or somewhere in explorer. Choose “Git GUI Here”, then “Clone Existing Repository”. Insert the resporitory URL as shown below, and specify the target directory. The target path must be a non-existing directory. Press Clone and wait. When done, the main Git window will open. You can just close this Window.
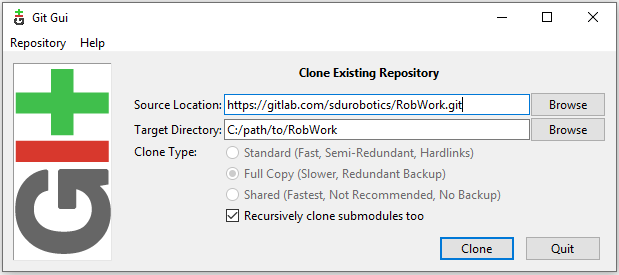
The Git checkout dialog for RobWork.
Alternatively, this can be done from the terminal: (be sure that you are located in the directory where you want to install RobWork)
git clone https://gitlab.com/sdurobotics/RobWork.git .
There should now be RobWork, RobWorkStudio and RobWorkSim folders inside the target directory.
Compiling RobWork
The challenging part when compiling RobWork on a Windows platform, is to get CMake to find the dependencies. One thing is to install and compile all the needed dependencies, another is to make sure that RobWork actually finds these dependencies. A good advice before building RobWork, is to actually read the CMake output carefully. The CMake output will typically reveal early in the process if a dependency was not found. Building RobWork can take quite some time, and it is a pitty building everything, just to discover that some functionality was disabled due to a unmet dependency (especially a problem for the optional dependencies).
To build RobWork, open a Visual Studio 64-bit command prompt and go to the directory where RobWork was checked out from Git. Add new build directories for the RobWork packages you want to compile, such as:
mkdir Build
mkdir Build\RW
mkdir Build\RWS
Now we are ready to build RobWork. You need to choose the generator that matches your Visual Studio version, and adjust all the paths given to CMake:
cd Build\RW
cmake -DCMAKE_BUILD_TYPE=Release -G "Visual Studio 15 2017 Win64" ^
      -DBoost_DIR="C:\ome\path\to\boost_1_74_0\lib64-msvc-14.2\cmake\Boost-1.74.0<" ^
      -DBoost_INCLUDEDIR="C:\ome\path\to\boost_1_74_0
      -DGTEST_ROOT:PATH="C:\some\path\to\GTest\googletest" ^
      -DGTEST_SOURCE:PATH="C:\some\path\to\GTest\googletest" ^
      -DXERCESC_ROOT:PATH="C:\some\path\to\xerces-c-3.2.1\xerces-install" ^
      -DSWIG_EXECUTABLE="C:\some\path\to\swigwin-3.0.12\swig.exe" ^
      -DBULLET_ROOT:PATH="C:\some\path\to\bullet3\install" ^
      ../../RobWork
The paths must be adjusted to your own compilation and installation of the dependencies. The images illustrating the directory layout for the relevant dependencies, will give a clue on which paths to pass to CMake. Notice that in practice you will not necessarily need to specify all of these paths. It depends on which dependencies you want to build with (except the mandatory Boost dependency of course).
Executing the CMake command will look like the following:
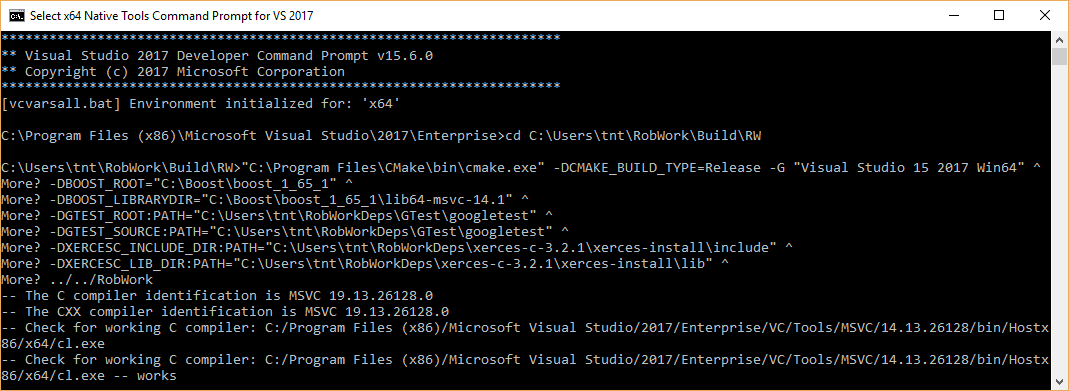
Running CMake for RobWork in a Visual Studio Prompt.
Look carefully through the CMake output and check that there is no errors, and that the required dependencies are correctly found. Now that the CMake files has been built, we are ready to compile the project. In the Build\RW folder there will now be a RobWork.sln solution that can be opened in Visual Studio. Choose the correct configuration (Release for instance) and build the solution.
If errors are encountered, try to decode them and adjust the paths if that is what is needed. CMake caches the result for the following runs of CMake. It is often a good idea to delete the CMakeCache.txt file to force CMake to run from scratch. The benefit of the cache is that you can run the CMake without specifying all the paths, as long as it has been run once before with the paths given. The disadvantage is that it might cause things to behave odd if you later change essential options CMake. If you update RobWork to a newer revision from the Git server, it is also possible that options can change (even though it is rare). If you encounter problems after such an update, always try to remove the CMakeCache.txt, rerun CMake and try to compile again.
If you go to the RobWork folder, you will se the following directory layout:
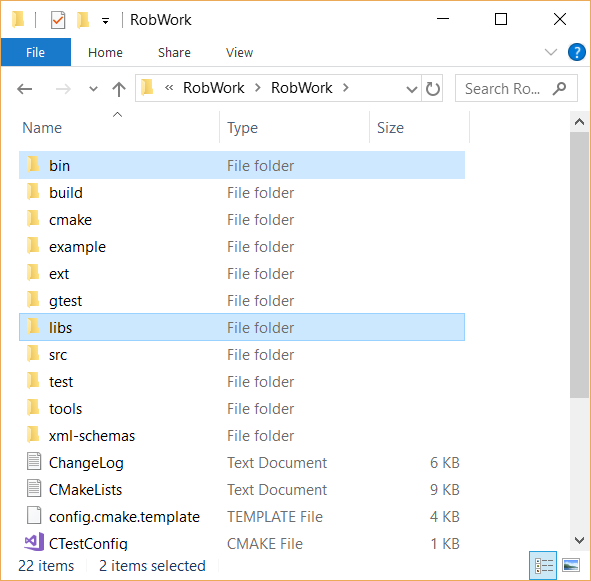
Directory layout of RobWork. Layout is similar for RobWorkStudio and RobWorkSim. Notice the bin and libs folders have been created and populated after the build in Visual Studio.
The bin folder will hold the compiled executables (for RobWork this will be unit test executables) and DLL’s for shared libraries.
The libs folder will hold the .lib files used to link to shared libraries, static libraries, and DLL’s for plugins.
Each of these folders are divided into four subfolders. Here you have to choose the subfolder that matches your build configuration (such as bin/release or libs/release).
RobWorkStudio
Wait with compilation of RobWorkStudio until you have RobWork successfully compiled. Then the same procedure is repeated in the RWS build folder. In this case we need to specify the Qt directory (shown previously in the Qt layout image). This directory is added to the CMAKE_PREFIX_PATH variable:
cd Build\RWS
cmake -DCMAKE_BUILD_TYPE=Release -G "Visual Studio 15 2017 Win64" -DCMAKE_PREFIX_PATH="C:\Qt\5.10.1\msvc2017_64" ../../RobWorkStudio
RobWorkSim
Finally, RobWorkSim can be compiled (when both RobWork and RobWorkStudio has been successfully compiled). Once again, the almost same procedure is repeated. This time we must specify the Qt, Bullet and ODE directories:
cd Build\RWS
cmake -DCMAKE_BUILD_TYPE=Release -G "Visual Studio 15 2017 Win64" -DCMAKE_PREFIX_PATH="C:\Qt\5.10.1\msvc2017_64" ^
      -DBULLET_ROOT:PATH="C:\some\path\to\bullet3\install" ^
      -DODE_DIR:PATH="C:\some\path\to\ode\install" ^
      ../../RobWorkSim
How to run a program after compilation
After you have compiled the different RobWork projects, you will want to launch a program, such as RobWorkStudio.exe which lies in RobWorkStudio/bin/release (or some other configuration than release). Often you will encounter error messages about DLL’s that can not be found. In this case you need to set your PATH environment. The folder that holds the given dll must be added to the PATH, and there are different ways to achieve this.
First, you can launch the program from a command prompt. Just before you launch the program, you can set the PATH with:
SET PATH=C:\path\to\some\dir;C:\path\to\some\other\dir;%PATH%
ECHO %PATH%
Which will tell Windows where to search for the runtime DLL’s. The path will typically need to include directories for DLL’s for Xerces, Qt, Boost, ODE, Bullet and other dependencies which might be dynamically linked. Some of these might also be statically linked, in which case it is not necessary to specify a path at runtime.
Another alternative is to set the PATH in Windows for either the entire system (all users) or your user. Go to the start menu and search for “environment”, to launch the necessary dialogs. To get directly to the dialogs, you can also run
SystemPropertiesAdvanced.exe
for the system-wide settings (requires administration rights) or
rundll32 sysdm.cpl,EditEnvironmentVariables
to edit the PATH for your own account only.
So which method is best?
For external depdendencies like Qt, Boost, Xerces and similar it will probably make sense to add the DLL’s to the PATH environment variable system-wide or for your user account. But only if you only have one installation of the given dependencies. If you have multiple different versions or configurations in your system for a single dependency, it is recommended to not have these in the system/user PATH variable. This is because it can cause some confusion, and errors that are hard to debug. It becomes difficult to really understand what version you are using when it is in the system/user path. In this case the first method is better. Here you explicitly state what DLL’s you want to use each time before you run the program. It is however a bit more difficult as it takes more work each time you want to launch the program. Here it is often useful to create a .bat script that set up the path and launches the program.
CMake Options & Environment
Above we used different CMake definitions to specify the paths to dependencies, choose the build configuration and the type of project to generate (Visual Studio projects). Some of the paths might also be set up as environment variables in the system. This might be useful in some cases, and will make it easier to run CMake without specifying all the paths. Again, using environment variables can also make the CMake process a lot less transparent, and it becomes difficult to understand where the dependencies are found and why.
The RobWork CMake system has been around since ancient versions of CMake. It is possible to adjust a huge number of variables to adjust which parts of RobWork is built, which dependencies are used, and if libraries should be static or shared. This is also complex because of the large number of (optional) dependencies, of which we only show some in this guide. We are constantly trying to modernize the CMake system to utilize more recent features, and we hope that this will make it easier to understand and use the build system. Recently, multiple of our dependencies switched to CMake based build systems, which makes the overall build procedure a lot easier, as users are able to repeat the same procedure using only CMake as build system.
In the future, we plan to use the CMake Options & Environment: page to give an overview of how to customize RobWork through CMake.